Have you ever wandered into a French bakery, completely entranced by the beautiful array of pastries, only to find yourself pointing at those adorable, caramelized heart-shaped cookies? Those, my friends, are palmiers – arguably one of the most delightful yet underrated treats in the pastry world. Today, I’m sharing my recipe for Sweet and Crunchy Cinnamon Palmiers that will transform your kitchen into a Parisian patisserie with surprisingly little effort.
What Are Palmiers?
Before we dive into the recipe, let’s get acquainted with these delectable treats. Palmiers (pronounced pal-mee-AY) are French pastries made from puff pastry that’s been folded with sugar to create a distinctive shape that resembles palm leaves, elephant ears, or hearts, depending on who you ask. When baked, the sugar caramelizes to create a gloriously crunchy, sweet exterior while maintaining a delicate, flaky interior.
I first encountered palmiers during a trip to Paris where I spent way too many euros at neighborhood bakeries. When I returned home, I was determined to recreate that perfect balance of caramelized crunch and buttery layers. After numerous attempts (and several happy taste-testers later), I’ve perfected a recipe that rivals those Parisian treats.
The Magic of Puff Pastry
The foundation of any good palmier is quality puff pastry. This laminated dough consists of layers upon layers of butter and dough that create that signature flaky texture we all love. While making puff pastry from scratch is a labor of love (and quite the time commitment), I’m letting you in on a little baker’s secret: store-bought puff pastry works beautifully for palmiers.
I’ve tested numerous brands over the years, and here’s my assessment of the top contenders:
| Brand | Butter Content | Flakiness (1-10) | Flavor (1-10) | Best For | Price Range |
|---|---|---|---|---|---|
| Dufour | All-butter | 9 | 9 | Special occasions | $$$$ |
| Trader Joe’s | All-butter | 8 | 8 | Everyday baking | $$ |
| Pepperidge Farm | Vegetable shortening blend | 7 | 6 | Budget-friendly option | $ |
| Wewalka | European-style butter | 8 | 8 | Wider sheets | $$$ |
| Homemade | Variable (typically 80% butter) | 10 | 10 | Complete control | Time investment |
For this recipe, any good quality store-bought puff pastry will work wonderfully, but if you’re feeling ambitious, I’ve included my homemade quick puff pastry recipe at the end of this article.
Ingredients You’ll Need
The beauty of palmiers lies in their simplicity. For basic cinnamon palmiers, you’ll need:
- 1 package (about 14 oz) puff pastry, thawed according to package directions
- 3/4 cup granulated sugar
- 2 tablespoons ground cinnamon
- 1/4 teaspoon fine sea salt
- 1 tablespoon orange zest (optional, but highly recommended)
- 1 teaspoon vanilla extract (mixed with 1 tablespoon water for brushing)
Equipment
Don’t worry – no fancy pastry tools required! You’ll just need:
- Rolling pin
- Baking sheets
- Parchment paper
- Pastry brush (optional)
- Sharp knife
- Cooling rack
Step-by-Step Instructions
I’ve broken down the process into manageable steps that even novice bakers can follow with confidence.
1. Prepare Your Work Surface
I always start by clearing a generous space on my countertop and lightly dusting it with about 1/4 cup of the sugar instead of flour. This is one of those little tricks that makes a big difference – the sugar will incorporate into the dough as you roll, creating extra caramelization.
2. Roll Out the Pastry
Place your thawed (but still cold) puff pastry on the sugar-dusted surface. Gently roll it into a rectangle approximately 12×16 inches, being careful not to press too hard – we want to preserve those beautiful layers!
3. Create the Cinnamon-Sugar Mixture
In a small bowl, combine the remaining sugar, cinnamon, salt, and orange zest if using. The orange zest adds a subtle brightness that balances the warm cinnamon beautifully – it’s my secret ingredient that elevates these palmiers from good to absolutely irresistible.
4. Apply the Filling
Brush the surface of your dough lightly with the vanilla-water mixture – this helps the cinnamon-sugar adhere better. Then, sprinkle the cinnamon-sugar mixture evenly across the entire surface, leaving about a 1/4-inch border. Use your rolling pin to gently press the sugar mixture into the dough.
5. The Crucial Fold
Now comes the part that gives palmiers their distinctive shape. This folding technique might seem fussy, but it’s actually quite forgiving:
- Identify the two long sides of your rectangle
- Fold each long side inward about 1/4 of the way toward the center
- Fold each side again, bringing them to meet exactly in the middle of the dough
- Finally, fold one half over the other, like closing a book
You should end up with a long, narrow strip with six layers of dough. If your dough becomes too soft during this process, pop it in the refrigerator for 15 minutes to firm up before continuing.
6. Chill for Success
This is where patience becomes a virtue. Wrap your folded dough in plastic wrap and refrigerate for at least 30 minutes, or up to overnight. This resting period helps the butter re-solidify, which is essential for achieving those perfectly flaky layers.
7. Slice and Shape
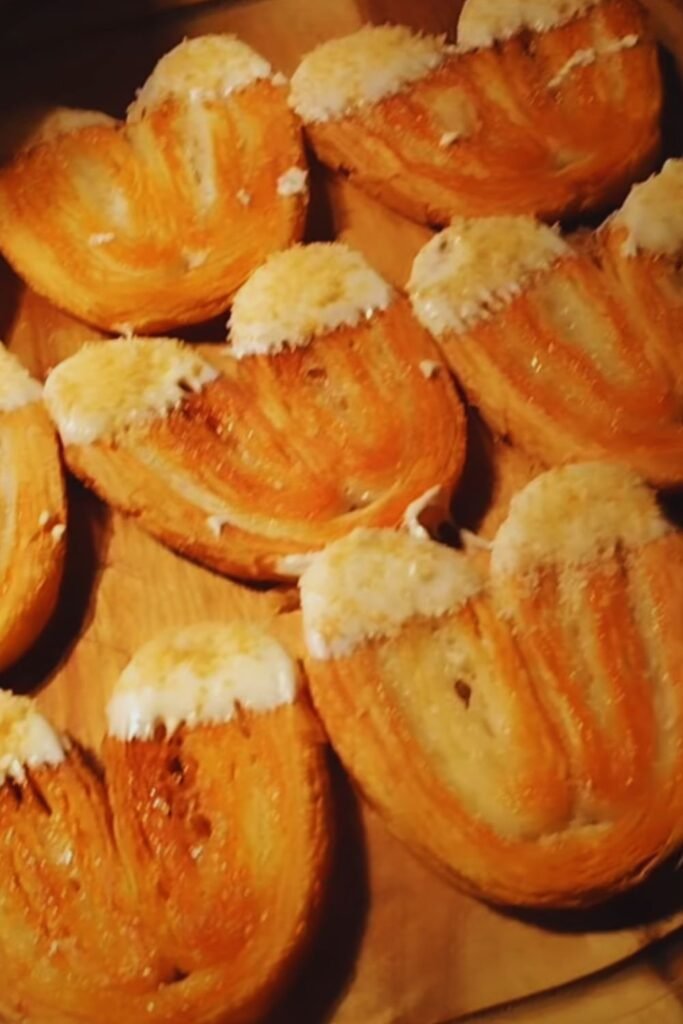
Once chilled, unwrap your dough and place it on a cutting board. Using a sharp knife, cut the log into slices approximately 1/2-inch thick. For traditional palmiers, place the slices cut-side up on parchment-lined baking sheets, spacing them about 2 inches apart – they will expand significantly!

8. Bake to Golden Perfection
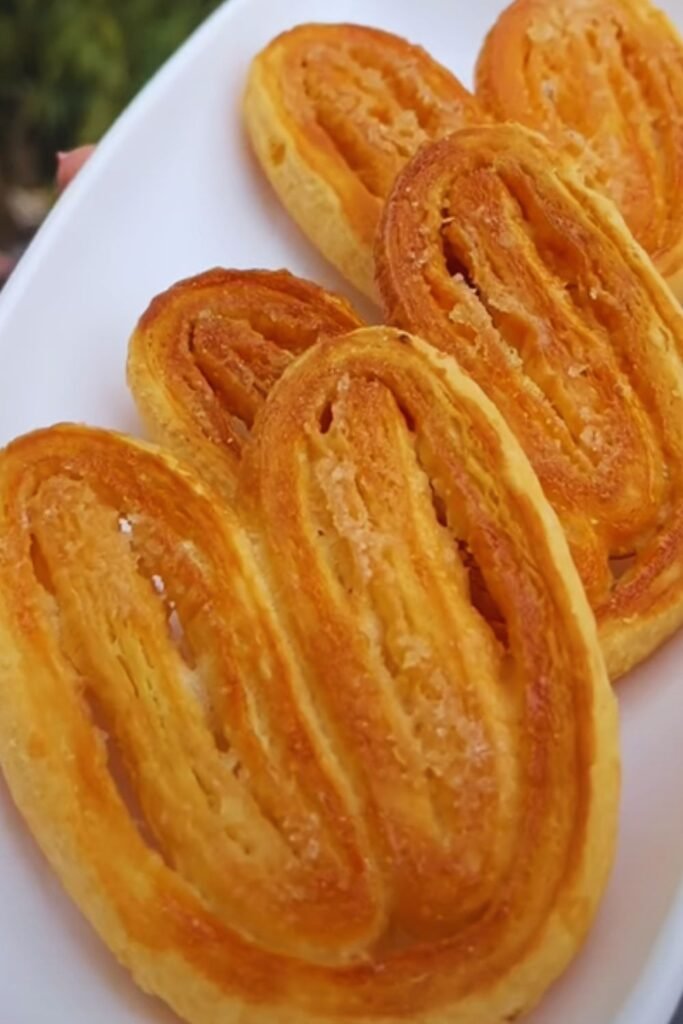
Preheat your oven to 400°F (200°C). Bake the palmiers for 10-12 minutes, then carefully flip each one and bake for another 5-7 minutes until they’re golden brown and caramelized. Keep a close eye on them toward the end – the difference between perfectly caramelized and burnt is just a minute or two!
9. The Cooling Phase
Allow the palmiers to cool on the baking sheet for about 5 minutes (they’re quite delicate when hot), then transfer them to a wire rack to cool completely. As they cool, they’ll crisp up even more, developing that signature crunch.
Troubleshooting Common Palmier Problems
Even experienced bakers encounter challenges with palmiers. Here are solutions to the most common issues:
| Problem | Likely Cause | Solution |
|---|---|---|
| Palmiers unraveled during baking | Dough was too warm | Chill shaped palmiers for 15 minutes before baking |
| Sugar burned before pastry cooked | Oven temperature too high | Reduce oven temperature by 25°F and extend baking time |
| Palmiers not crispy enough | Underbaked or too thick | Slice thinner and/or bake a bit longer |
| Dough difficult to fold | Too cold or too warm | Let sit at room temperature for 5-10 minutes or chill for 15 minutes |
| Center layers still doughy | Cut too thick | Slice thinner, around 1/4 to 1/2 inch maximum |
| Uneven browning | Oven hot spots | Rotate pan halfway through baking |
| Sugar crystallized instead of caramelized | Sugar granules too large | Use finer sugar or pulse granulated sugar in food processor |
Flavor Variations to Try
While the classic cinnamon version holds a special place in my heart, palmiers are incredibly versatile. Here are some variations I’ve experimented with over the years:
- Chocolate-Hazelnut: Spread a thin layer of chocolate-hazelnut spread before the final fold, then proceed as usual
- Savory Cheese: Replace sugar with grated Parmesan and add herbs like thyme or rosemary
- Cardamom-Orange: Substitute cardamom for cinnamon and double the orange zest
- Maple-Pecan: Use brown sugar instead of white, add crushed pecans, and brush with maple syrup after baking
- Coconut-Lime: Mix shredded coconut with the sugar and add lime zest instead of orange
Storage and Make-Ahead Tips
Palmiers are at their absolute best the day they’re made when the caramelization is fresh and the crunch is undeniable. However, they can be stored in an airtight container at room temperature for up to 3 days. To refresh day-old palmiers, pop them in a 300°F oven for 3-5 minutes.
For make-ahead convenience:
- Prepare the dough through the folding stage and refrigerate for up to 2 days
- Freeze the uncut log for up to 1 month
- Freeze unbaked cut palmiers on a baking sheet, then transfer to a container and bake directly from frozen (add 2-3 minutes to the baking time)
Serving Suggestions
I love serving these palmiers:
- Alongside morning coffee or afternoon tea
- Crumbled over vanilla ice cream for an elevated dessert
- As part of a dessert platter with fresh berries and whipped cream
- Packaged in a beautiful tin as a homemade gift
- Stacked on a cake stand for an impressive yet easy party dessert
The Historical Journey of Palmiers
These delightful pastries have a fascinating history that dates back to the early 20th century in France. Originally called “palmiers” due to their resemblance to palm leaves (palmier is French for “palm tree”), they’re known by many names around the world:
- Palmiers or Cœurs de France (Hearts of France) in France
- Elephant Ears in the United States
- Butterfly Pastries in China
- Schweineohren (Pig’s Ears) in Germany
- Orejas (Ears) in Spain
The beauty of palmiers lies in their elegant simplicity – a testament to the French pastry philosophy that the most basic ingredients can create the most extraordinary results when handled with care and precision.
Health-Conscious Adaptations
While traditional palmiers are undeniably an indulgence, I’ve experimented with some modifications for those looking for slightly healthier options:
- Reduce the overall sugar by 25% without significantly affecting the caramelization
- Use coconut sugar for a less refined option (though the flavor will be more pronounced)
- Create a spiced version with less sugar but more warm spices like cinnamon, cardamom, and nutmeg
- For a whole grain touch, look for whole wheat puff pastry (it exists in some specialty stores!)
Remember though, sometimes a small portion of the real thing is more satisfying than a larger portion of a modified version.
Quick Puff Pastry Recipe (Optional)
If you’re feeling ambitious, here’s my recipe for quick puff pastry that works beautifully for palmiers:
Ingredients:
- 2 cups (250g) all-purpose flour
- 1/4 teaspoon salt
- 1 cup (225g) very cold unsalted European-style butter, cut into 1/2-inch cubes
- 2/3 cup ice water
Method:
- Combine flour and salt in a large bowl
- Add butter cubes and toss to coat with flour
- Using your fingertips, quickly smash each butter cube once (just once!) to flatten slightly
- Drizzle ice water over the mixture and stir with a fork until shaggy dough forms
- Turn onto a lightly floured surface and press into a rough rectangle
- Using the “book fold” method, fold the dough like a letter, then give it a quarter turn
- Roll out again and repeat the fold 4 more times
- Wrap in plastic and chill for at least 1 hour before using
Q&A Section
Q: Can I use phyllo dough instead of puff pastry?
While they might look similar, phyllo and puff pastry have very different structures. Phyllo is paper-thin sheets of dough layered with oil or butter, while puff pastry has the butter incorporated into the dough through folding. For authentic palmiers, puff pastry is essential – phyllo simply won’t give you the same result.
Q: Why did my palmiers spread too much and lose their shape?
This usually happens when the butter in the puff pastry gets too warm before baking. The solution is to make sure your shaped palmiers are thoroughly chilled before they go into the oven. If your kitchen is particularly warm, pop the shaped palmiers into the freezer for 10 minutes before baking.
Q: Can I make palmiers without sugar for a savory version?
Absolutely! Savory palmiers are delicious. Replace the sugar with ingredients like grated Parmesan, finely chopped herbs, sun-dried tomatoes, or pesto. Just be sure to finely chop any fillings so they don’t tear the delicate layers of pastry.
Q: My palmiers didn’t get as flaky as I expected. What went wrong?
Flakiness in palmiers comes from proper lamination in the puff pastry. If using store-bought, make sure you’re using actual puff pastry, not crescent roll dough. If making your own, ensure your butter stays cold throughout the process, and be careful not to overwork the dough, which can develop gluten and make the pastry tough rather than flaky.
Q: How can I tell when palmiers are done baking?
The perfect palmier should be deeply golden (not pale) with visible caramelization around the edges. The bottom should be evenly browned, and when cooled, they should be crisp throughout with no doughy center. If in doubt, it’s better to slightly over-bake than under-bake – just keep a close eye on them in those final minutes.
Q: Can I use brown sugar instead of white sugar?
Yes, brown sugar creates a more molasses-like, complex caramel flavor. However, it tends to melt faster than white sugar, so watch your baking time carefully. I often use a mixture of both – white sugar for dusting the work surface and brown sugar in the filling.
Final Thoughts
What I love most about palmiers is their chameleon-like ability to be both incredibly impressive yet disarmingly simple. They’re the pastry world’s best-kept secret – looking like they require a pastry chef’s expertise but actually being accessible to even novice bakers.
I encourage you to try this recipe and experiment with your own variations. There’s something deeply satisfying about transforming a humble sheet of puff pastry into these glorious, caramelized swirls. And when someone inevitably asks, “Did you really make these yourself?” you get to smile and nod, knowing that sometimes the most impressive creations are also the most straightforward.
Whether they remind you of palm leaves, elephant ears, or hearts, these sweet and crunchy cinnamon palmiers are bound to become a staple in your baking repertoire. Happy baking!