Have you ever found yourself standing at the dessert table, torn between the silky allure of cheesecake and the irresistible combination of chocolate and peanut butter? I certainly have, and after years of this sweet dilemma, I decided to put an end to the internal debate by creating what I now consider the ultimate dessert masterpiece: a Peanut Butter and Chocolate Cheesecake drizzled with homemade caramel sauce.
This isn’t just any cheesecake. It’s a celebration of complementary flavors—the nutty depth of peanut butter, the rich complexity of chocolate, the tangy brightness of cream cheese, and the buttery sweetness of caramel—all coming together in perfect harmony. Whether you’re planning a special dinner, looking to impress at a potluck, or simply treating yourself after a long week, this showstopper dessert promises to elevate any occasion.
The Magic Behind This Decadent Creation
The beauty of this recipe lies in its thoughtful layering of flavors and textures. Each component plays a crucial role:
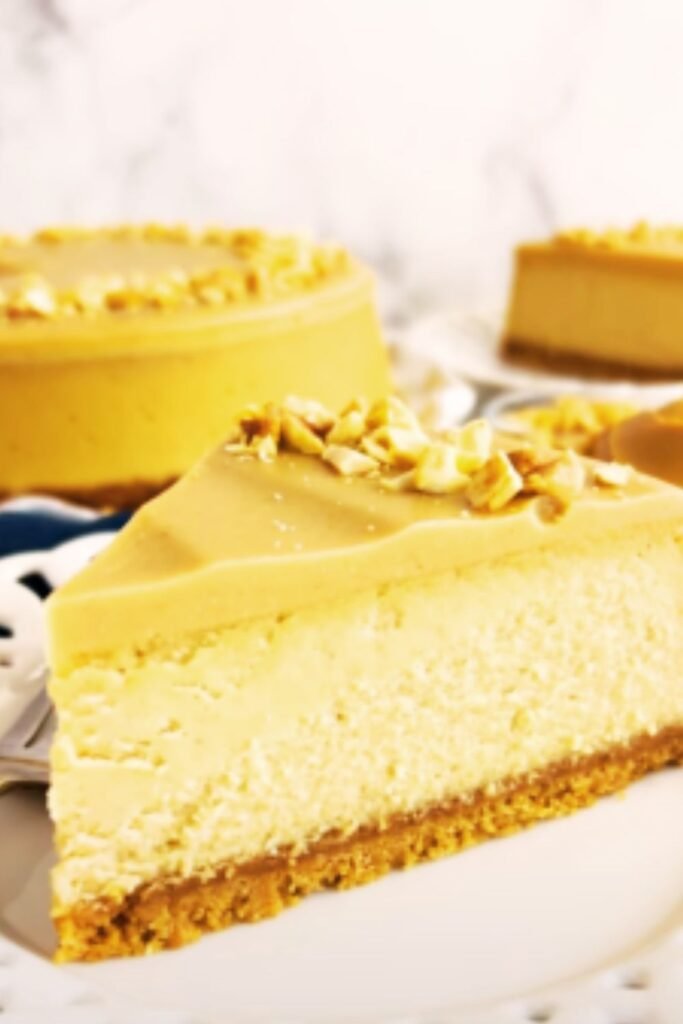
- The crust: A chocolate cookie base infused with crushed peanuts provides the perfect foundation—crunchy, slightly salty, and deeply satisfying.
- The filling: Velvety smooth cream cheese enriched with peanut butter creates a mousse-like texture that melts in your mouth.
- The ganache: A glossy chocolate topping adds richness and visual appeal.
- The crown jewel: Homemade caramel sauce that ties everything together with its buttery sweetness.
I’ve tested this recipe countless times (much to the delight of my neighbors and family), adjusting proportions and techniques until achieving the perfect balance. The result is a dessert that looks impressive yet follows straightforward techniques that even novice bakers can master.
Ingredients: Quality Matters
For the Crust:
- 2 cups chocolate cookie crumbs (about 24 Oreos, filling removed)
- ½ cup unsalted roasted peanuts, finely chopped
- 6 tablespoons unsalted butter, melted
- Pinch of sea salt
For the Filling:
- 24 ounces (3 blocks) cream cheese, room temperature
- 1 cup smooth peanut butter (not natural style)
- 1 cup granulated sugar
- 4 large eggs, room temperature
- ¼ cup heavy cream
- 2 teaspoons pure vanilla extract
- ½ teaspoon salt
For the Chocolate Ganache:
- 8 ounces dark chocolate (60-70% cacao), finely chopped
- ¾ cup heavy cream
- 2 tablespoons unsalted butter
- 1 teaspoon vanilla extract
For the Caramel Sauce:
- 1 cup granulated sugar
- ¼ cup water
- ½ cup heavy cream, warmed
- 4 tablespoons unsalted butter, cubed
- ½ teaspoon sea salt
- 1 teaspoon vanilla extract
Equipment You’ll Need
- 9-inch springform pan
- Parchment paper
- Stand mixer or hand mixer
- Measuring cups and spoons
- Rubber spatula
- Large roasting pan (for water bath)
- Aluminum foil
- Saucepan
- Heat-resistant bowl for melting chocolate
- Cooling rack
The Art of Preparation
Creating the Perfect Foundation: The Crust
- Preheat your oven to 325°F (165°C).
- Wrap the outside of a 9-inch springform pan with a double layer of heavy-duty aluminum foil, ensuring it comes at least 2 inches up the sides (this prevents water seepage during baking).
- In a medium bowl, combine the chocolate cookie crumbs, chopped peanuts, melted butter, and salt, mixing until the mixture resembles wet sand.
- Press this mixture firmly into the bottom and about 1 inch up the sides of your prepared springform pan. I find using a flat-bottomed measuring cup helps achieve an even, well-packed crust.
- Bake for 10 minutes, then remove and cool on a wire rack while preparing the filling. Keep the oven on.
The Heart of the Matter: The Filling
- In the bowl of a stand mixer fitted with the paddle attachment (or using a hand mixer), beat the cream cheese on medium speed until completely smooth and free of lumps, about 3-4 minutes. Don’t skimp on this step—smooth cream cheese is crucial for a silky texture.
- Add the peanut butter and beat until fully incorporated and smooth.
- Gradually add the sugar, beating until the mixture is light and fluffy, about 2 minutes.
- Add the eggs one at a time, beating on low speed just until each is incorporated. Over-mixing after adding eggs can introduce too much air, leading to cracks.
- Stir in the heavy cream, vanilla extract, and salt until just combined.
- Pour the filling into the cooled crust, smoothing the top with a spatula.
The Secret to Crack-Free Cheesecake: The Water Bath
- Place the foil-wrapped springform pan into a larger roasting pan.
- Pour hot water into the roasting pan until it reaches about halfway up the sides of the springform pan.
- Carefully transfer to the oven and bake for 55-65 minutes, until the edges are set but the center still has a slight jiggle.
- Turn off the oven, crack the door open slightly, and let the cheesecake cool in the oven for 1 hour (this gradual cooling prevents cracks).
- Remove from the oven, then from the water bath, and cool completely on a wire rack.
- Once cooled to room temperature, refrigerate for at least 4 hours, preferably overnight.
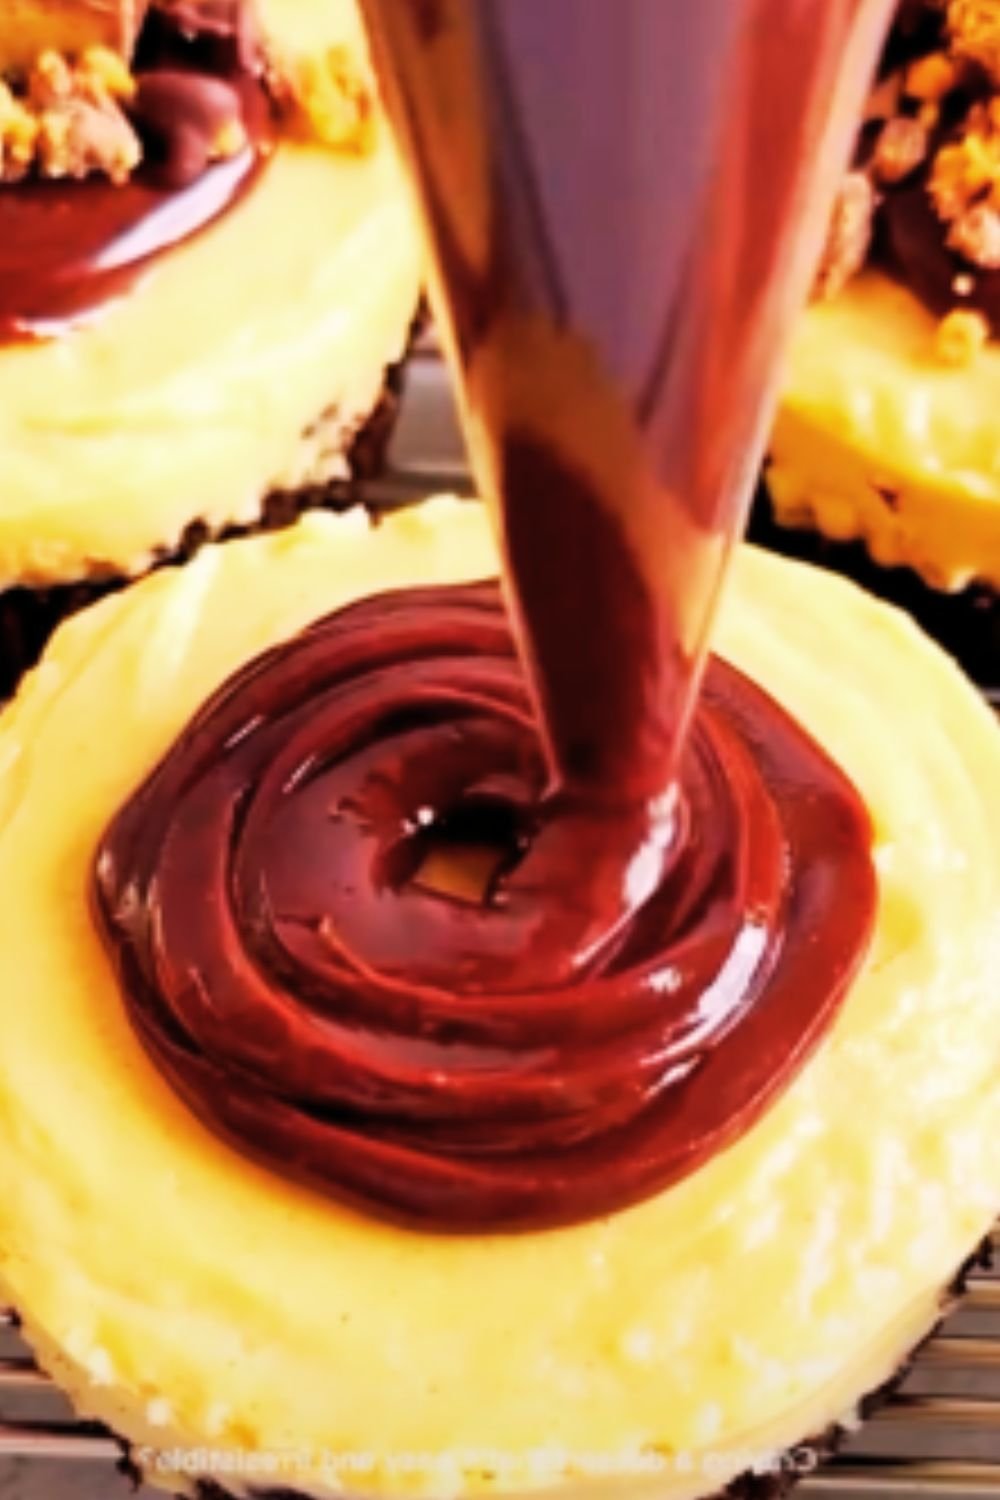
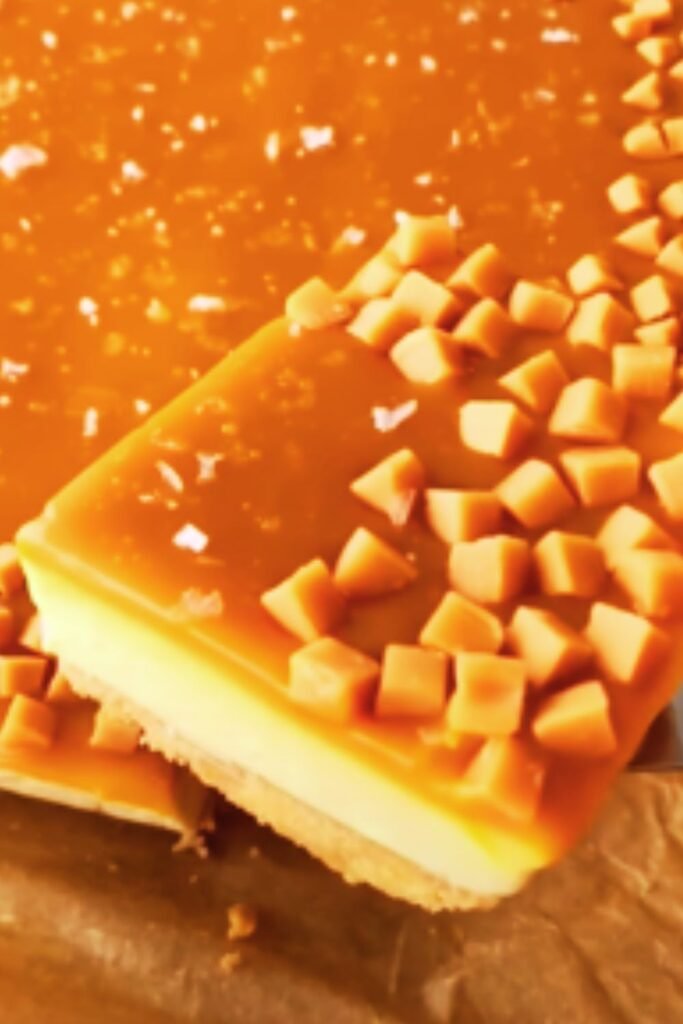
The Crowning Glory: Chocolate Ganache & Caramel Sauce
For the Ganache:
- Place the finely chopped chocolate in a heat-resistant bowl.
- In a small saucepan, heat the heavy cream just until it begins to simmer around the edges (do not boil).
- Pour the hot cream over the chocolate and let stand for 1 minute.
- Gently stir until the chocolate is completely melted and the mixture is smooth.
- Add the butter and vanilla, stirring until incorporated and glossy.
- Allow to cool slightly until the ganache thickens but remains pourable.
- Pour over the chilled cheesecake, spreading to the edges and allowing some to drip decoratively down the sides.
- Return to the refrigerator to set, about 30 minutes.
For the Caramel Sauce:
- In a medium, heavy-bottomed saucepan, combine the sugar and water, stirring just until the sugar is moistened.
- Cook over medium-high heat without stirring (swirl the pan occasionally) until the mixture turns a deep amber color, about 8-10 minutes.
- Remove from heat and carefully add the warmed heavy cream (mixture will bubble vigorously).
- Once the bubbling subsides, add the butter and stir until smooth.
- Stir in the salt and vanilla extract.
- Allow to cool to room temperature before drizzling over the cheesecake.
Mastering the Technique: Tips for Success
Creating a perfect cheesecake requires attention to detail, but these tips will set you up for success:
- Room temperature ingredients are non-negotiable: Cold cream cheese leads to lumps, and cold eggs won’t incorporate properly.
- The paddle attachment is your friend: It incorporates ingredients without adding too much air, unlike the whisk attachment.
- Low and slow is the way to go: Baking at a moderate temperature in a water bath ensures gentle, even cooking.
- Patience during cooling: The gradual temperature decrease prevents cracks and ensures a perfect texture.
- Make-ahead friendly: This cheesecake actually improves with time, making it perfect for advance preparation.
- Clean cuts: Dip your knife in hot water and wipe clean between each slice for picture-perfect presentation.
Nutritional Information
For those keeping track of dietary information, here’s a breakdown per serving (assuming 12 slices):
| Nutrient | Amount per Serving |
|---|---|
| Calories | 685 |
| Total Fat | 51g |
| Saturated Fat | 25g |
| Trans Fat | 0g |
| Cholesterol | 145mg |
| Sodium | 410mg |
| Total Carbohydrates | 48g |
| Dietary Fiber | 2g |
| Sugars | 38g |
| Protein | 13g |
| Calcium | 120mg |
| Iron | 2mg |
Serving Suggestions

While this cheesecake is certainly spectacular on its own, I love to elevate it further with thoughtful accompaniments:
- A scoop of vanilla bean ice cream provides temperature contrast and cuts through the richness
- Fresh berries—particularly raspberries or strawberries—add brightness and visual appeal
- A sprinkle of flaky sea salt brings out the caramel and chocolate notes
- A dash of espresso powder in the ganache enhances the chocolate flavor without tasting like coffee
- For special occasions, edible gold leaf makes for a stunning garnish
Storage Instructions
This cheesecake keeps beautifully in the refrigerator for up to 5 days. Store in an airtight container or cover tightly with plastic wrap to prevent it from absorbing other flavors.
You can also freeze individual slices or the entire cheesecake (without the caramel sauce) for up to 2 months:
- Place the cheesecake on a baking sheet and freeze until firm, about 4 hours
- Wrap tightly in plastic wrap, then aluminum foil
- Thaw overnight in the refrigerator before serving
- Add fresh caramel sauce just before serving
Variations to Explore
The basic framework of this recipe invites creative adaptations:
| Variation | Crust Modification | Filling Twist | Topping Alternative |
|---|---|---|---|
| Salted Caramel | Add pretzel pieces to the crust | Swirl in 1/4 cup caramel before baking | Sprinkle with flaky sea salt |
| Triple Chocolate | Use all chocolate cookies | Add 1/4 cup cocoa powder to filling | White chocolate drizzle |
| Banana Lover’s | Graham cracker crust | Fold in 1 cup roasted banana puree | Brûléed banana slices |
| Holiday Spice | Add 1 tsp cinnamon to crust | Stir in 1 tsp pumpkin pie spice | Cinnamon whipped cream |
| Coffee Infused | Espresso powder in crust | Add 2 tbsp coffee extract | Coffee bean garnish |
Frequently Asked Questions
Q: Can I make this cheesecake without a springform pan? A: While a springform pan is ideal, you can use a regular 9-inch cake pan lined with parchment paper with extra hanging over the sides as “handles” to lift the cheesecake out after chilling.
Q: Why did my cheesecake crack? A: Cheesecakes typically crack due to drastic temperature changes or overmixing. Ensure you’re using room temperature ingredients, mixing just until combined after adding eggs, using a water bath, and cooling gradually.
Q: Can I substitute natural peanut butter? A: I don’t recommend it. Natural peanut butter has different oil content and can separate, affecting the texture and stability of your cheesecake. Stick with conventional smooth peanut butter.
Q: My caramel crystallized. What went wrong? A: Crystallization usually happens when sugar crystals form on the sides of the pan. To prevent this, avoid stirring once the mixture begins to boil, and consider brushing the sides of the pan with water using a pastry brush.
Q: Can I make this recipe gluten-free? A: Absolutely! Simply substitute the cookie crumbs with gluten-free chocolate cookies or a mixture of almond flour, cocoa powder, and butter for the crust. The filling is naturally gluten-free.
Q: How do I know when my cheesecake is done? A: The perfect cheesecake should still have a slight wobble in the center when gently shaken. The edges should be set, but the center should jiggle like set gelatin. It will continue to set as it cools.
Q: Can I make mini cheesecakes with this recipe? A: Definitely! Line a muffin tin with paper liners, press the crust into each cup, fill with the cheesecake mixture, and reduce the baking time to about 20-25 minutes.
Why This Cheesecake Will Become Your Signature Dessert
I’ve brought this cheesecake to countless gatherings, and without fail, it becomes the centerpiece of conversation. There’s something about the combination of familiar flavors elevated to something extraordinary that resonates with people.
What I love most about this recipe is its versatility—it’s sophisticated enough for a dinner party but comforting enough for a family dessert. The rich, creamy texture and the interplay of sweet and salty notes create a dessert experience that lingers in memory.
While it might seem complex at first glance, the process unfolds naturally once you begin. Each step builds on the last, creating not just a dessert but a culinary experience. The time invested—from carefully bringing ingredients to room temperature to the slow cooling process—pays dividends in flavor and texture.
So go ahead, set aside an afternoon to craft this masterpiece. Turn on some music, embrace the process, and prepare to create not just a cheesecake but a tradition—one that might just become your most requested recipe for years to come.