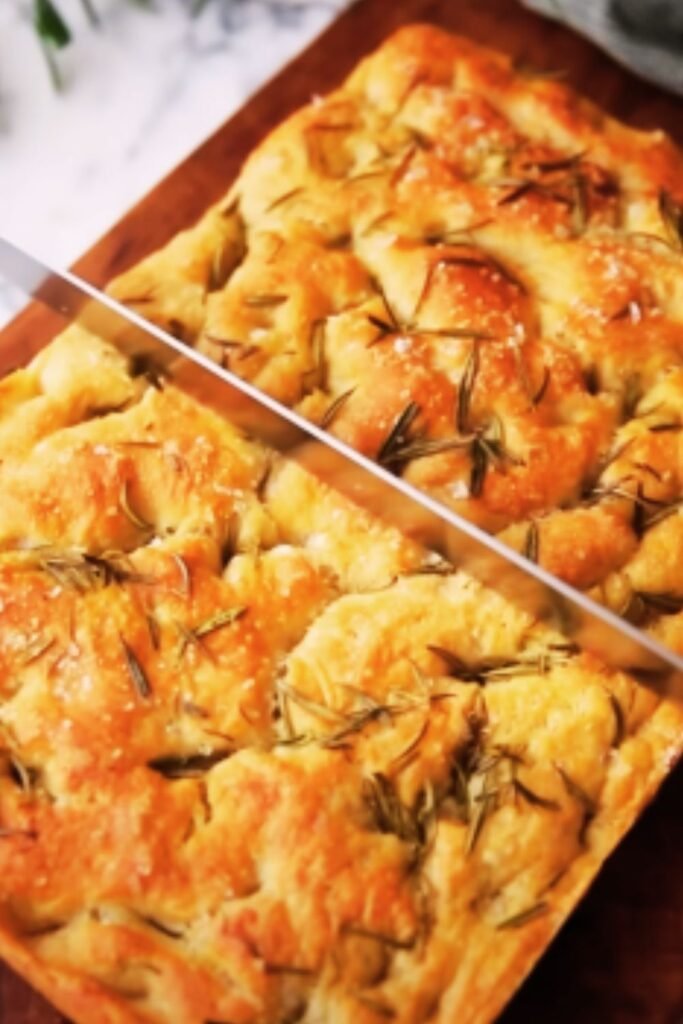
There’s something magical about pulling a golden, dimpled loaf of focaccia from my oven. The crispy exterior gives way to an airy, tender crumb that’s been kissed with olive oil and herbs. I’ve been making sourdough focaccia for years, and I can confidently say it’s one of the most forgiving and rewarding breads you can bake at home.
When I first started my sourdough journey, focaccia became my gateway bread. Unlike traditional sourdough loaves that require precise shaping and scoring, focaccia embraces imperfection. Those characteristic dimples? They’re not flaws – they’re features that create pockets for olive oil and toppings to nestle into.
What makes this recipe particularly special is how it transforms a simple sourdough starter into something extraordinary with minimal effort. I’ve refined this method over countless batches, learning from both successes and the occasional dense loaf. The result is a foolproof recipe that delivers consistent results, even for complete beginners.
Understanding Sourdough Focaccia
Sourdough Focaccia: A flatbread that uses natural fermentation from a sourdough starter instead of commercial yeast, resulting in complex flavors and improved digestibility.
Autolyse: The process of combining flour and water and letting them rest, which allows enzymes to break down proteins and develop gluten naturally.
Bulk Fermentation: The first rise period where the dough develops structure and flavor through fermentation.
Cold Fermentation: Refrigerating the dough to slow fermentation, which develops deeper flavors and makes the dough easier to handle.
The beauty of sourdough focaccia lies in its simplicity. While traditional bread recipes can be intimidating with their precise timings and techniques, focaccia forgives minor mistakes and actually benefits from a more relaxed approach. The high hydration creates an open crumb structure, while the olive oil keeps everything moist and flavorful.
Essential Ingredients and Equipment
Core Ingredients
| Ingredient | Amount | Purpose | Quality Tips |
|---|---|---|---|
| Bread Flour | 500g | Provides structure and protein | Choose flour with 12-14% protein content |
| Water | 375g | Hydrates flour and activates starter | Use filtered water if your tap water is heavily chlorinated |
| Active Sourdough Starter | 100g | Natural leavening agent | Should double in size within 4-8 hours when fed |
| Extra Virgin Olive Oil | 60ml + extra | Flavor and texture | Use high-quality oil for best taste |
| Sea Salt | 10g | Flavor enhancement | Avoid table salt; use coarse sea salt or kosher salt |
Optional Toppings
| Topping Category | Options | Application Method | Flavor Profile |
|---|---|---|---|
| Herbs | Rosemary, thyme, oregano, sage | Press into surface before baking | Aromatic and earthy |
| Vegetables | Cherry tomatoes, red onion, bell peppers | Slice and arrange on top | Fresh and colorful |
| Cheese | Parmesan, mozzarella, goat cheese | Sprinkle or crumble over surface | Rich and creamy |
| Aromatics | Garlic cloves, caramelized onions | Embed in dough | Savory and pungent |
Equipment You’ll Need
I keep my focaccia equipment simple, but these tools make the process smoother:
- Large mixing bowl (preferably glass or ceramic)
- Kitchen scale (accuracy is crucial)
- 9×13 inch baking pan or similar
- Clean kitchen towel
- Plastic wrap or damp cloth
- Measuring cups and spoons
- Sharp knife for scoring (optional)

Step-by-Step Focaccia Method
Stage 1: Preparing Your Starter
Before I begin any sourdough project, I ensure my starter is at peak activity. I feed my starter the night before baking, using a 1:1:1 ratio of starter, flour, and water. By morning, it should be doubled in size with a pleasant, slightly tangy aroma.
Signs of an Active Starter:
- Doubles in size within 8 hours of feeding
- Passes the float test (a spoonful floats in water)
- Has a sweet, yeasty smell with mild tanginess
- Shows visible bubbles throughout
Stage 2: Mixing the Dough
I start by combining the flour and water in my large mixing bowl. This initial mixture looks shaggy and rough – that’s perfectly normal. I let this autolyse for 30 minutes, which gives the flour time to fully hydrate and begin developing gluten naturally.
After the autolyse period, I add my active starter and salt. Rather than kneading, I use a technique called “folding in the bowl.” I wet my hand to prevent sticking, then grab one side of the dough, stretch it up, and fold it over to the opposite side. I rotate the bowl 90 degrees and repeat this process four times.
Stage 3: Bulk Fermentation
This is where patience pays off. I cover the bowl with a damp cloth and let the dough ferment at room temperature. During this 4-6 hour period, I perform a series of folds every 30 minutes for the first 2 hours.
Folding Technique:
- Wet your hand to prevent sticking
- Grab the dough from one side
- Stretch upward and fold over to the opposite side
- Rotate bowl 90 degrees
- Repeat for all four sides
- Let rest until next fold
The dough transforms dramatically during bulk fermentation. What starts as a sticky, unmanageable mass becomes smooth and elastic. I know it’s ready when the dough has increased by about 50% in size and feels jiggly when I shake the bowl gently.
Stage 4: Cold Fermentation (Optional but Recommended)
While not strictly necessary, I highly recommend refrigerating the dough overnight. This cold fermentation develops complex flavors and makes the dough much easier to handle. I cover the bowl tightly with plastic wrap and refrigerate for 12-24 hours.
Cold fermentation also provides flexibility in timing. I can start the dough one day and bake it the next, fitting bread-making into my schedule rather than organizing my day around the bread.
Shaping and Final Preparation
Preparing the Pan
I generously oil my 9×13 inch pan with olive oil. This isn’t just to prevent sticking – it creates the crispy bottom crust that makes focaccia so irresistible. I use about 2 tablespoons of oil, making sure to coat the bottom and sides thoroughly.
Transferring and Shaping
Working with cold dough is a pleasure compared to room temperature dough. I gently turn the dough out onto the oiled pan and let it rest for 10 minutes to relax. Then I begin stretching it to fit the pan, working from the center outward.
If the dough resists stretching, I don’t force it. Instead, I let it rest another 10 minutes and continue. This patience prevents tearing and ensures an even thickness across the focaccia.
Creating the Signature Dimples
The dimpling process is both functional and traditional. I oil my fingers generously and press them into the dough, creating deep dimples across the entire surface. These pockets will hold olive oil and toppings, creating bursts of flavor in every bite.
Dimpling Tips:
- Use fingertips, not knuckles
- Press firmly but don’t tear the dough
- Space dimples about an inch apart
- Don’t worry about perfection – irregularity adds character
Final Rise
I cover the dimpled dough and let it rise for 45-60 minutes at room temperature. The dough should look puffy and spring back slowly when gently poked. During this time, I preheat my oven to 425°F (220°C).
Baking to Perfection
Pre-Baking Preparation
Just before baking, I drizzle additional olive oil over the surface, allowing it to pool in the dimples. This is when I add my toppings – fresh herbs pressed gently into the surface, halved cherry tomatoes, or thinly sliced red onions.
I also sprinkle coarse sea salt over the entire surface. This finishing salt provides textural contrast and enhances all the other flavors. I prefer flaky sea salt or kosher salt for its clean taste and attractive appearance.
Baking Process
Into the preheated oven goes my focaccia. I bake it for 25-30 minutes, until the top is golden brown and the edges are crispy. The internal temperature should reach 200°F (93°C) when measured with an instant-read thermometer.
Visual Cues for Doneness:
- Golden brown color across the surface
- Edges pulling slightly from the pan sides
- Firm to the touch (not soft or squishy)
- Internal temperature of 200°F (93°C)
The aroma during baking is intoxicating – a combination of toasted wheat, olive oil, and herbs that fills the entire kitchen. I resist the urge to open the oven door frequently, as this can cause temperature fluctuations.

Cooling and Serving
Proper Cooling Technique
Patience during cooling is crucial, though admittedly difficult when the focaccia smells so incredible. I let it cool in the pan for 5 minutes, then turn it out onto a wire rack. This prevents the bottom from becoming soggy while maintaining the crispy crust.
The focaccia continues cooking slightly from residual heat, so I resist cutting into it for at least 15 minutes. This resting period allows the crumb to set properly and makes slicing cleaner.
Serving Suggestions
Focaccia’s versatility makes it suitable for any meal. For breakfast, I serve it warm with butter and jam. At lunch, it becomes the foundation for sandwiches filled with fresh mozzarella, tomatoes, and basil. For dinner, I slice it thick and use it to soak up pasta sauces or serve alongside soup.
Creative Serving Ideas:
- Cut into squares for antipasto platters
- Slice horizontally for sandwich bread
- Cube for homemade croutons
- Serve warm with balsamic vinegar and olive oil for dipping
- Pair with fresh cheese and charcuterie
Troubleshooting Common Issues
Dense, Heavy Texture
This usually indicates insufficient fermentation or inactive starter. I ensure my starter doubles in size before using it, and I allow adequate time for bulk fermentation. Room temperature affects timing significantly – cooler kitchens require longer fermentation periods.
Pale, Soft Crust
Inadequate olive oil or too low oven temperature causes this issue. I’m generous with oil on both the bottom and top of the focaccia, and I verify my oven temperature with an oven thermometer.
Dough Too Sticky to Handle
High hydration dough requires different techniques than traditional bread dough. I keep my hands wet when handling the dough and avoid adding extra flour, which would make the final product dense.
Variations and Flavor Combinations
Mediterranean Focaccia
| Ingredient | Amount | Application |
|---|---|---|
| Kalamata olives | 1/2 cup, pitted and halved | Press into surface |
| Sun-dried tomatoes | 1/3 cup, chopped | Distribute evenly |
| Fresh rosemary | 2 tablespoons | Sprinkle over top |
| Feta cheese | 4 oz, crumbled | Add in final 10 minutes |
Caramelized Onion and Thyme
I slowly caramelize two large onions until they’re golden and sweet, then spread them over the dimpled dough before baking. Fresh thyme leaves and a sprinkle of Parmesan complete this savory combination.
Everything Bagel Focaccia
For a modern twist, I brush the surface with beaten egg and sprinkle everything bagel seasoning generously over the top. The combination of sesame seeds, poppy seeds, garlic, and onion creates a familiar yet surprising flavor profile.
Storage and Reheating
Short-Term Storage
Fresh focaccia keeps well at room temperature for 2-3 days when wrapped in a clean kitchen towel. I avoid plastic wrap for storage, as it makes the crust soft and chewy rather than maintaining the desired texture contrast.
Freezing for Later
Focaccia freezes beautifully for up to three months. I wrap cooled focaccia tightly in plastic wrap, then place it in a freezer bag. To thaw, I leave it at room temperature for several hours, then refresh it in a 350°F oven for 5-10 minutes.
Reheating Techniques
| Method | Time | Best For | Results |
|---|---|---|---|
| Oven (350°F) | 8-10 minutes | Whole loaf | Crispy crust, warm interior |
| Toaster oven | 3-5 minutes | Individual slices | Quick and convenient |
| Skillet | 2-3 minutes per side | Slices | Adds extra crispiness |
| Microwave | 20-30 seconds | Quick warming | Soft texture only |
Nutritional Benefits and Digestibility
Sourdough fermentation offers several advantages over commercial yeast breads. The long fermentation process partially breaks down gluten proteins, making the bread easier to digest for some individuals. The natural acids produced during fermentation also help preserve the bread naturally and may improve mineral absorption.
Nutritional Highlights per serving (1/12 of recipe):
- Calories: Approximately 180
- Protein: 6g
- Carbohydrates: 32g
- Fiber: 2g
- Healthy fats from olive oil
- Probiotics from fermentation process
The olive oil provides heart-healthy monounsaturated fats, while the fermentation process creates beneficial compounds that support digestive health. Using quality flour adds essential minerals and B vitamins to the nutritional profile.
Building Confidence Through Practice
My first focaccia wasn’t perfect – it was slightly dense and unevenly baked. But even that imperfect loaf tasted incredible compared to store-bought bread. Each subsequent batch taught me something new about dough behavior, fermentation timing, and flavor development.
I encourage beginners to embrace the learning process. Keep notes about what works in your kitchen, with your starter, and in your climate. Sourdough baking is as much art as science, and developing intuition takes time and practice.
The forgiving nature of focaccia makes it an ideal learning bread. Unlike artisan loaves that require precise shaping and scoring, focaccia celebrates rustic imperfection. Every dimple tells a story, and every irregular edge adds character.
Questions and Answers
Q: Can I make focaccia without a sourdough starter?
Absolutely! You can substitute active dry yeast for the sourdough starter. Use 1 teaspoon of active dry yeast dissolved in warm water, and reduce the bulk fermentation time to 1-2 hours. However, you’ll miss the complex flavors that natural fermentation provides.
Q: How do I know if my sourdough starter is ready to use?
Your starter should double in size within 4-8 hours of feeding and pass the float test – a spoonful should float when dropped in water. It should smell pleasantly tangy and yeasty, not overly sour or alcoholic.
Q: Why is my focaccia dense instead of airy?
Dense focaccia usually results from insufficient fermentation, inactive starter, or over-mixing. Ensure your starter is active, allow adequate fermentation time, and handle the dough gently using folding techniques rather than traditional kneading.
Q: Can I add toppings during bulk fermentation?
I recommend adding most toppings just before baking to prevent them from interfering with fermentation. However, hardy herbs like rosemary can be incorporated during the final shaping stage.
Q: How long can I keep the dough in the refrigerator?
Cold dough can be refrigerated for up to 3 days. The flavors continue developing during this time, often resulting in more complex taste. Bring the dough to room temperature before final shaping and baking.
Q: What’s the best flour for sourdough focaccia?
Bread flour with 12-14% protein content works best, providing enough gluten development for proper structure. All-purpose flour can work but may result in a slightly less chewy texture.
Q: Can I make individual focaccia portions?
Yes! Divide the dough into 6-8 portions and shape them on parchment-lined baking sheets. Reduce baking time to 15-20 minutes and watch carefully for golden browning.
Q: How do I prevent the bottom from burning?
Use a heavy-bottomed pan and consider placing a baking sheet on the oven rack below to deflect heat. If your oven runs hot, reduce the temperature by 25°F and extend baking time slightly.
Q: What’s the difference between focaccia and pizza dough?
Focaccia typically has higher hydration and more olive oil than pizza dough, resulting in a more tender, cake-like texture. Pizza dough is usually stiffer and designed to support toppings without becoming soggy.
Q: Can I make focaccia ahead for entertaining?
Focaccia is excellent for make-ahead entertaining. Bake it in the morning and serve at room temperature, or bake it the day before and reheat briefly before serving. The flavors often improve after a few hours of resting.
This sourdough focaccia recipe has become my go-to for both everyday meals and special occasions. Its reliability and versatility make it a valuable addition to any baker’s repertoire, while its forgiving nature makes it perfect for building confidence in sourdough techniques. Whether you’re just beginning your sourdough journey or looking to expand your bread-baking skills, this focaccia will deliver consistent, delicious results that will have everyone asking for the recipe.