Have you ever bitten into a potato that’s somehow magically crispy on the outside yet melts in your mouth like butter on the inside? If not, you’re in for a life-changing culinary experience. Melting potatoes aren’t just another side dish—they’re a revelation that transforms the humble spud into something extraordinary.
I discovered melting potatoes during a particularly cold winter when I was craving something comforting yet impressive enough to serve to unexpected dinner guests. What started as an experiment has become my most requested recipe, and for good reason. These golden-brown beauties deliver a texture contrast that few potato dishes can match: a caramelized exterior giving way to a creamy, almost custard-like interior.
The magic lies not in complicated techniques or fancy ingredients but in understanding a few simple cooking principles that I’ll share with you today. Let’s dive into the wonderful world of melting potatoes—I promise your dinner table will never be the same again.
What Makes Melting Potatoes Special?
Before we get to the recipe, let’s talk about what makes these potatoes truly unique. Unlike traditional roasted potatoes that focus mainly on achieving crispiness, melting potatoes balance three crucial elements:
- Caramelization: The high-heat roasting creates a deeply golden exterior through the Maillard reaction
- Internal creaminess: The cooking method ensures the centers become almost pudding-like
- Flavor infusion: The potatoes roast in a savory broth that they absorb during cooking
The result is a potato that’s neither fully roasted nor fully mashed but something gloriously in between—a potato that truly “melts” in your mouth.
Selecting the Perfect Potatoes
The foundation of extraordinary melting potatoes begins with choosing the right variety. Not all potatoes are created equal when it comes to this particular cooking method.
Yukon Golds are my go-to choice for several reasons:
- Their medium starch content creates the perfect balance of crisp exterior and creamy interior
- Their naturally buttery flavor enhances the richness of the dish
- Their thin skin can be left on for added texture and nutrition
Russets will work in a pinch, but they tend to be a bit too starchy, potentially creating a drier interior. Red potatoes, while waxy and good at holding their shape, don’t quite achieve that signature “melting” quality we’re after.
Whatever variety you choose, look for medium-sized potatoes with smooth, unblemished skin. Uniformity in size ensures even cooking—an important factor in achieving that perfect texture contrast throughout your batch.
Essential Ingredients for Perfect Melting Potatoes
The beauty of melting potatoes lies in their simplicity. You’ll need:
| Ingredient | Amount | Purpose |
|---|---|---|
| Yukon Gold potatoes | 2 pounds (about 6-8 medium) | The star of the show |
| Unsalted butter | 4 tablespoons | Creates richness and aids in caramelization |
| Olive oil | 2 tablespoons | Raises the smoke point and adds flavor complexity |
| Fresh rosemary | 2 tablespoons, chopped | Provides aromatic woody notes |
| Fresh thyme | 1 tablespoon, chopped | Adds earthy, slightly floral flavor |
| Garlic | 4-6 cloves, minced | Infuses potatoes with aromatic depth |
| Chicken or vegetable broth | 1 cup | Creates steam and gets absorbed for flavor |
| Kosher salt | 1½ teaspoons | Enhances all flavors and aids in moisture extraction |
| Black pepper | ½ teaspoon | Adds gentle heat and complexity |
Optional Flavor Enhancers
| Ingredient | Amount | Flavor Contribution |
|---|---|---|
| Parmesan cheese | ¼ cup, grated | Adds umami and subtle saltiness |
| Lemon zest | 1 teaspoon | Brightens flavors with citrus notes |
| Red pepper flakes | ¼ teaspoon | Provides gentle heat |
| Fresh parsley | 2 tablespoons, chopped | Adds color and fresh flavor to finish |
The Step-by-Step Process
Preparation Phase
- Preheat your oven to 450°F (232°C). This high temperature is crucial for achieving the caramelized exterior.
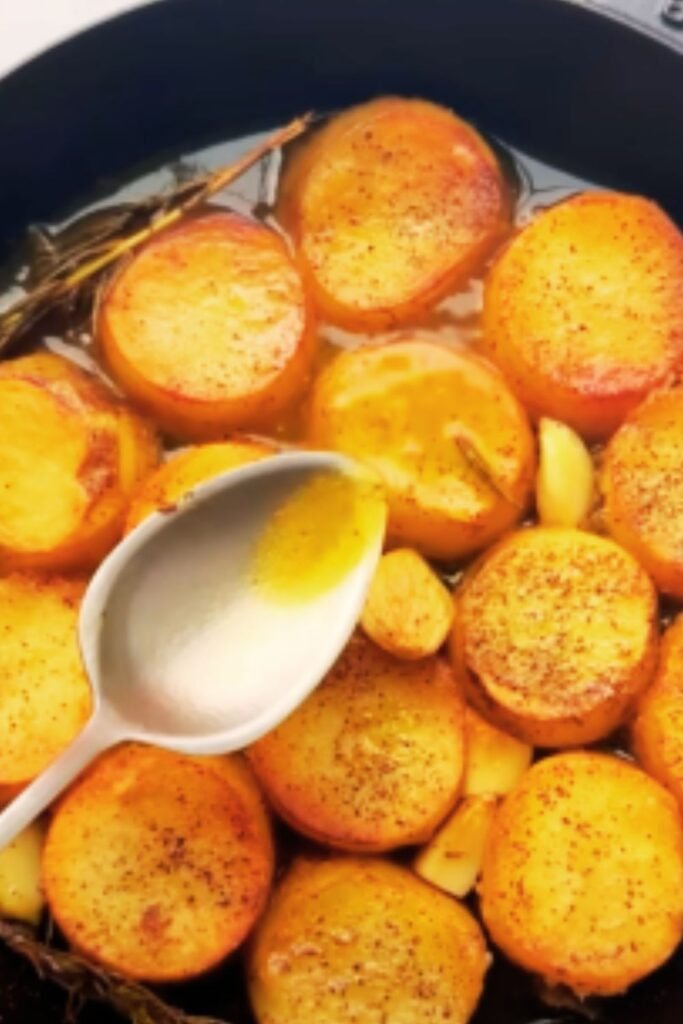
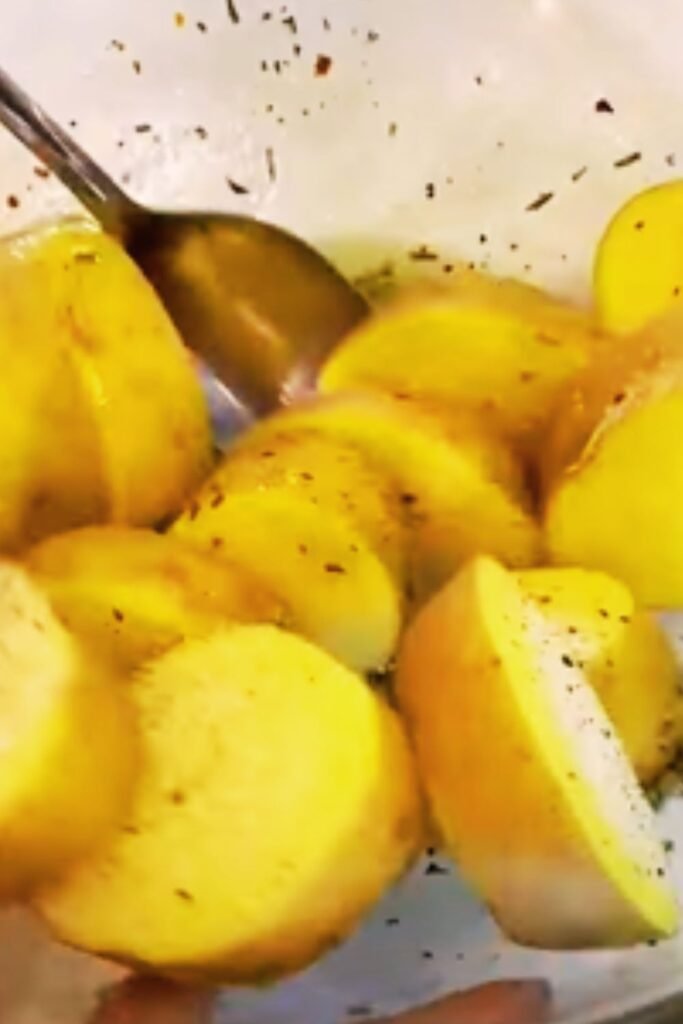
- Prepare your potatoes: Wash the potatoes thoroughly under cold running water. For melting potatoes, I slice them into 1-inch thick rounds. The thickness is crucial—too thin and they’ll crisp up completely without developing that melting center; too thick and they won’t cook through properly.
- Pat dry: Using paper towels, dry the potato slices thoroughly. Excess moisture is the enemy of caramelization.
- Prepare your baking dish: Choose a high-sided roasting pan or cast iron skillet that can accommodate your potato slices in a single layer with a little breathing room between each piece.
The First Roast: Creating the Foundation
- Create your flavor base: In a small saucepan, melt your butter and combine it with olive oil, 1 tablespoon of the rosemary, and half of the minced garlic. Heat gently for about 30 seconds to infuse the fats with flavor without burning the garlic.
- Season the potatoes: Place the potato slices in a large mixing bowl. Pour the butter mixture over them, add salt and pepper, then toss gently until each slice is evenly coated.
- Arrange for roasting: Place the potato slices in a single layer in your prepared baking dish. Make sure they’re not touching—this ensures air circulation for even browning.
- First roasting phase: Place in the preheated oven and roast for 15 minutes.
- Flip and continue: After 15 minutes, remove the pan from the oven and carefully flip each potato slice. Return to the oven for another 15 minutes.
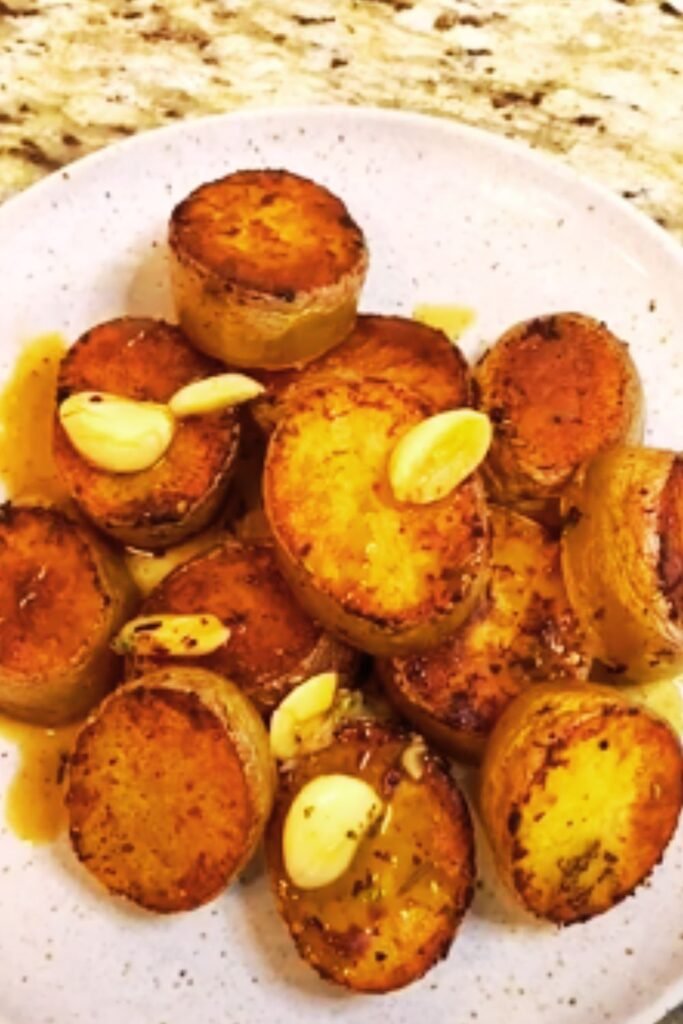
The Second Phase: The Melting Magic
This is where the transformation from ordinary roasted potatoes to melting potatoes happens!
- Prepare your broth mixture: While the potatoes are roasting, warm your broth and mix in the remaining garlic, thyme, and rosemary.
- Add the liquid: After the second 15-minute roasting period, pull the pan out and carefully pour the broth mixture around the potatoes—not over them, as you want to preserve their crispy tops.
- Final roasting: Return the pan to the oven for a final 15-20 minutes. During this time, the potatoes will absorb some of the flavorful liquid while maintaining their caramelized exterior.
- Rest before serving: Allow the potatoes to rest in the pan for 5 minutes after removing from the oven. This resting period allows the flavors to settle and the interior texture to reach peak meltiness.
Common Mistakes to Avoid
| Mistake | Consequence | Solution |
|---|---|---|
| Slicing too thin | Potatoes will crisp entirely without developing the creamy center | Maintain 1-inch thickness consistently |
| Overcrowding the pan | Potatoes will steam rather than roast | Use a larger pan or cook in batches |
| Skipping the drying step | Potatoes won’t brown properly | Take time to thoroughly pat slices dry |
| Using low heat | Won’t achieve proper caramelization | Keep oven at the full 450°F |
| Adding broth too early | Prevents development of crispy exterior | Follow the two-stage roasting process |
| Using cold broth | Creates temperature shock that affects texture | Warm broth before adding to hot pan |
Variations to Try
Once you’ve mastered the basic melting potato recipe, you might want to experiment with these delicious variations:
Herb and Cheese Explosion
Enhance the final stage by adding:
- ½ cup grated Gruyère cheese
- 1 tablespoon chopped fresh dill
- 1 tablespoon chopped chives
Sprinkle over potatoes during the last 5 minutes of roasting for a decadent, cheese-pull effect.
Mediterranean Inspiration
Modify your base seasonings with:
- 1 teaspoon dried oregano
- 1 tablespoon lemon juice
- 2 teaspoons lemon zest
- ¼ cup crumbled feta (added after roasting)
Smoky Southwest
Transform the flavor profile with:
- 1 teaspoon smoked paprika
- ½ teaspoon ground cumin
- 1 teaspoon chipotle powder
- Finish with chopped cilantro and lime zest
Serving Suggestions
Melting potatoes shine as a side dish, but their versatility might surprise you. Here are my favorite ways to serve them:
Perfect Pairings
| Main Dish | Why It Works |
|---|---|
| Roasted chicken | The potatoes soak up the chicken juices beautifully |
| Grilled steak | The rich potato texture complements the meat’s chew |
| Baked salmon | The herbs in the potatoes echo traditional seafood seasonings |
| Vegetable Wellington | Provides satisfying starchy complement to vegetable proteins |
Beyond the Side Dish
While traditionally served as a side, I’ve found some creative ways to make melting potatoes the star:
- Loaded Melters: Top with sour cream, chives, and crumbled bacon for an elegant take on loaded potatoes
- Brunch Sensation: Use as a base for poached eggs with hollandaise sauce
- Appetizer Potential: Make mini versions in a muffin tin and top with smoked salmon and dill cream for party bites
Make-Ahead Tips
I often get asked if melting potatoes can be prepared in advance. The answer is yes—with some caveats:
- Partial pre-cooking: Complete the first 30 minutes of roasting, then cool and refrigerate.
- Day-of finishing: Bring to room temperature, then complete the final broth stage and roasting.
- Reheating: Already-completed melting potatoes can be reheated at 350°F for about 10 minutes, though they’re best fresh from their initial cooking.
Troubleshooting Your Melting Potatoes
Even experienced cooks occasionally run into issues. Here’s how to solve common melting potato problems:
Exterior Not Crisping
Possible causes:
- Oven temperature too low
- Potatoes too close together
- Too much moisture on potatoes before roasting
Solutions:
- Verify your oven temperature with an oven thermometer
- Ensure potatoes are in a single layer with space between
- Pat potatoes dry thoroughly before adding fats
Interior Not “Melting”
Possible causes:
- Potato slices too thin
- Wrong potato variety
- Third stage (broth stage) too short
Solutions:
- Check your slice thickness—aim for a full inch
- Switch to Yukon Golds if using another variety
- Ensure adequate time in the broth roasting stage
Broth Evaporates Too Quickly
Possible causes:
- Oven running hot
- Pan sides too low
- Excess surface area in pan
Solutions:
- Reduce oven to 425°F for the final stage
- Use a higher-sided roasting vessel
- Add slightly more broth initially
The Nutritional Picture
While not a low-calorie dish, melting potatoes offer numerous nutritional benefits when enjoyed as part of a balanced meal:
| Nutrient | Amount per Serving | Benefit |
|---|---|---|
| Potassium | ~600mg | Supports healthy blood pressure |
| Vitamin C | ~12mg | Immune support and collagen production |
| Vitamin B6 | ~0.4mg | Supports nervous system function |
| Fiber | ~2g | Digestive health and satiety |
| Protein | ~3g | Tissue repair and maintenance |
A typical serving (about 3-4 potato rounds) contains approximately:
- Calories: 220
- Fat: 12g
- Carbohydrates: 25g
- Protein: 3g
The retention of the potato skin adds additional fiber and nutrients, making this an indulgent side dish with genuine nutritional benefits.
Frequently Asked Questions
Q: Can I use another type of potato if I can’t find Yukon Golds?
While Yukon Golds are ideal, Russet potatoes are the next best option. They will create a slightly different texture (more fluffy than melting), but still delicious. Just watch them carefully as they may cook a bit faster due to their higher starch content.
Q: Is there a dairy-free version of melting potatoes?
Absolutely! Replace the butter with additional olive oil or use a high-quality plant-based butter. The texture won’t be identical, but you’ll still achieve that wonderful contrast between crisp exterior and tender interior.
Q: Can I make these in an air fryer?
I’ve experimented with air fryer versions, and while they’re good, they don’t achieve quite the same “melting” quality. The enclosed oven environment with the broth is key to the signature texture. If you must use an air fryer, you’ll need to adapt by adding a small heat-safe container of broth to create steam within the air fryer.
Q: How do I prevent the potatoes from sticking to the pan?
The combination of butter and oil usually prevents sticking, but if you’ve had issues in the past, I recommend using a well-seasoned cast iron skillet or lining your roasting pan with parchment paper for the first two roasting stages (remove before adding broth).
Q: Can I use dried herbs instead of fresh?
Yes, though you’ll want to reduce the quantity by about two-thirds when substituting dried herbs for fresh. Dried herbs are more concentrated in flavor. For best results, add dried herbs to the butter as it melts to help bloom their flavors.
Q: Why aren’t my potatoes getting that golden-brown color?
Proper browning requires high heat, dry surfaces, and enough fat. Make sure your oven is fully preheated to 450°F, your potatoes are thoroughly dried before tossing with fat, and you’re using the recommended amount of butter and oil.
My Personal Tips for Potato Perfection
After making melting potatoes hundreds of times, I’ve collected a few insider tips that make a noticeable difference:
- Season generously: Potatoes absorb a lot of salt. Don’t be shy with your seasoning, especially before the first roast.
- Warm your broth: Cold broth hitting a hot pan creates temperature shock. Gently warming your broth before adding it makes a difference in the final texture.
- Use a metal spatula: When flipping, a thin metal spatula helps maintain the caramelized crust better than plastic or wood tools.
- Fresh garlic matters: Pre-minced jarred garlic won’t provide the same aromatic quality. The few extra seconds spent mincing fresh cloves makes a world of difference.
- Rest before serving: That 5-minute rest after removing from the oven isn’t optional—it’s when the interior texture truly develops its signature “melting” quality.
Melting potatoes have become my signature side dish for good reason—they combine elegant presentation with comforting flavors and that irresistible textural contrast. Whether for a special occasion or to elevate a weeknight dinner, they never fail to impress.
I hope you’ll try this recipe and experience the potato revelation that awaits. I’d love to hear how your melting potatoes turn out and what variations you discover along the way!