There’s something absolutely magical about the aroma of garlic knots baking in my oven. The combination of buttery, garlicky goodness wrapped around tender, pillowy dough creates an irresistible treat that never fails to disappear within minutes of coming out of the oven. I’ve been perfecting my homemade garlic knots recipe for years, and I’m thrilled to share every secret I’ve learned along the way.
Garlic knots represent the perfect marriage of simplicity and flavor. These twisted beauties originated in pizzerias across New York, where resourceful bakers transformed leftover pizza dough into golden, aromatic delights. What started as a clever way to minimize waste has evolved into a beloved appetizer and side dish that graces tables from casual family dinners to elegant dinner parties.
My journey with garlic knots began during my college years when I worked at a local Italian restaurant. Watching the head baker effortlessly twist dough into perfect knots while infusing them with aromatic garlic butter sparked my passion for recreating these delectable morsels at home. After countless experiments and taste tests, I’ve developed a foolproof method that delivers consistently amazing results every single time.
Understanding Garlic Knots: More Than Just Twisted Bread
Garlic Knots: Small portions of yeasted dough twisted into knot shapes, baked until golden, and brushed with seasoned garlic butter
Pizza Dough Base: The foundation using flour, yeast, water, salt, and olive oil that creates the characteristic chewy yet tender texture
Garlic Butter Mixture: A combination of melted butter, minced garlic, herbs, and seasonings that provides the signature flavor profile
Proofing Process: The crucial rising period that allows yeast to ferment and create the light, airy texture
The beauty of garlic knots lies in their versatility and approachable nature. Unlike more complex bread recipes that require specialized equipment or techniques, garlic knots welcome home bakers of all skill levels. The dough is forgiving, the shaping process is intuitive, and the results are consistently impressive.
Essential Ingredients for Perfect Garlic Knots
Creating exceptional garlic knots starts with selecting quality ingredients. I’ve learned that each component plays a crucial role in achieving the perfect balance of flavor and texture.
For the Dough:
- 3 cups all-purpose flour (plus extra for dusting)
- 1 packet (2¼ teaspoons) active dry yeast
- 1 cup warm water (110°F to 115°F)
- 2 tablespoons olive oil
- 1 teaspoon salt
- 1 teaspoon sugar
For the Garlic Butter:
- 4 tablespoons unsalted butter
- 4 cloves garlic, minced
- 2 tablespoons fresh parsley, finely chopped
- ½ teaspoon dried oregano
- ¼ teaspoon salt
- ¼ teaspoon black pepper
- 2 tablespoons grated Parmesan cheese
The quality of your ingredients directly impacts the final result. I always use fresh garlic rather than pre-minced varieties because it provides a more vibrant, pungent flavor. Similarly, freshly grated Parmesan cheese melts better and contributes a richer taste than pre-grated alternatives.
Step-by-Step Instructions for Homemade Garlic Knots
Preparing the Dough
My dough-making process begins with activating the yeast, a step that ensures your garlic knots will achieve the perfect rise and texture.
- Activate the Yeast: In a small bowl, combine warm water and sugar, stirring until dissolved. Sprinkle the yeast over the surface and let it sit for 5-10 minutes until foamy and bubbly. This foam indicates that your yeast is alive and ready to work its magic.
- Create the Dough Base: In a large mixing bowl, combine flour and salt. Create a well in the center and pour in the activated yeast mixture along with olive oil. Using a wooden spoon or your hands, mix until a shaggy dough forms.
- Knead to Perfection: Turn the dough onto a lightly floured surface and knead for 8-10 minutes until smooth and elastic. The dough should spring back when gently pressed with your finger. If it feels sticky, gradually add small amounts of flour, but be careful not to add too much as this can make your knots tough.
- First Rise: Place the kneaded dough in a lightly oiled bowl, turning it to coat all sides. Cover with a damp cloth or plastic wrap and let it rise in a warm, draft-free location for 1-1.5 hours, or until doubled in size.
Shaping the Knots
The shaping process is where the magic happens, transforming simple dough into elegant twisted knots.
- Prepare Your Workspace: Lightly flour your work surface and have a baking sheet lined with parchment paper ready.
- Divide the Dough: Punch down the risen dough to release air bubbles. Divide it into 12 equal pieces, roughly the size of golf balls. I find it helpful to use a kitchen scale for even portions.
- Roll and Shape: Take each piece and roll it into a rope approximately 8 inches long. The key is to apply gentle, even pressure while rolling to maintain consistent thickness.
- Create the Knots: To form each knot, create a loop with your dough rope, then tuck one end through the loop and pull gently to tighten. The result should look like a loose knot with two ends protruding.
- Final Arrangement: Place shaped knots on your prepared baking sheet, spacing them about 2 inches apart to allow for expansion during the final rise.

The Second Rise and Baking Process
- Second Rise: Cover the shaped knots with a clean kitchen towel and let them rise for 30-45 minutes until puffy and increased in size by about 50%.
- Preheat Your Oven: During the last 15 minutes of rising time, preheat your oven to 400°F (200°C).
- Prepare the Garlic Butter: While the oven preheats, melt butter in a small saucepan over low heat. Add minced garlic and cook for 1-2 minutes until fragrant but not browned. Remove from heat and stir in parsley, oregano, salt, pepper, and Parmesan cheese.
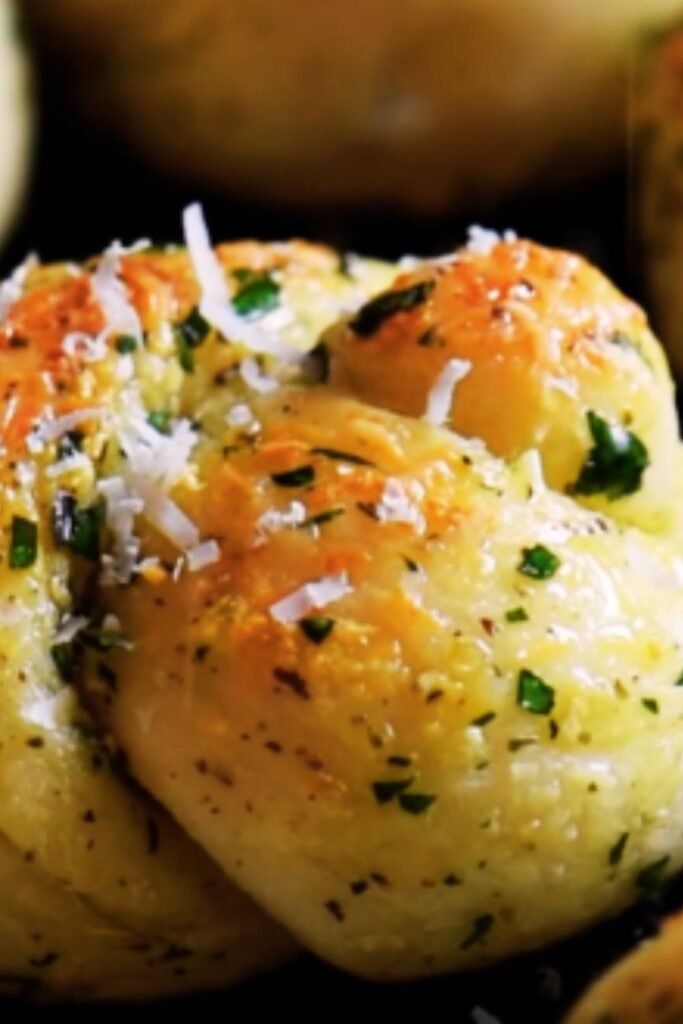
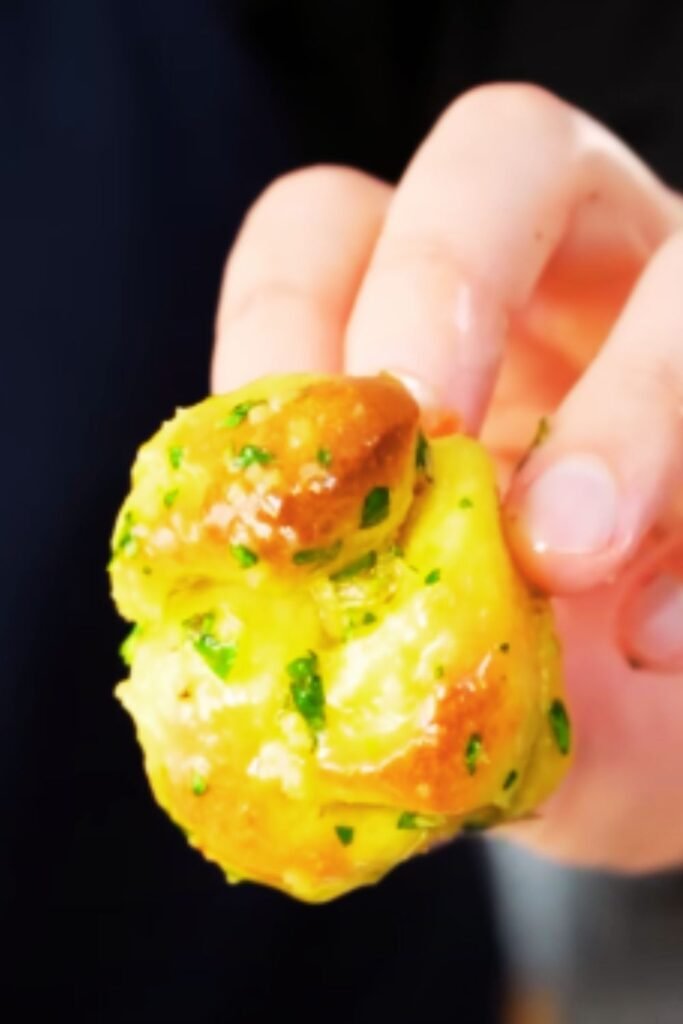
- Bake to Golden Perfection: Bake the knots for 15-18 minutes until golden brown on top and hollow-sounding when tapped on the bottom.
- Apply the Finishing Touch: Immediately brush the hot knots with the prepared garlic butter mixture, ensuring each knot is generously coated.
Nutritional Information and Serving Details
Understanding the nutritional content of your homemade garlic knots helps you incorporate them thoughtfully into your meal planning.
| Nutritional Component | Per Serving (1 knot) | Daily Value % |
|---|---|---|
| Calories | 165 | 8% |
| Total Fat | 5.2g | 8% |
| Saturated Fat | 2.1g | 11% |
| Cholesterol | 8mg | 3% |
| Sodium | 285mg | 12% |
| Total Carbohydrates | 25g | 9% |
| Dietary Fiber | 1.2g | 4% |
| Sugars | 1g | – |
| Protein | 4.8g | 10% |
| Vitamin A | 85 IU | 2% |
| Vitamin C | 1.2mg | 2% |
| Calcium | 35mg | 4% |
| Iron | 1.8mg | 10% |
Based on 12 servings per batch
Storage and Reheating Guidelines
Proper storage ensures your garlic knots maintain their delicious flavor and texture for future enjoyment.
Short-Term Storage
- Room Temperature: Store covered at room temperature for up to 2 days
- Refrigerator: Keep in airtight container for up to 5 days
- Freezer: Wrap individually and freeze for up to 3 months
Reheating Methods
- Oven Method: Preheat to 350°F, wrap knots in foil, heat for 8-10 minutes
- Microwave: Heat for 20-30 seconds, though texture may become slightly chewy
- Toaster Oven: Heat for 3-4 minutes until warmed through
Variations and Flavor Combinations
Over the years, I’ve experimented with numerous variations that add exciting twists to the classic garlic knot formula.
Herb Variations
- Rosemary Garlic Knots: Add 1 tablespoon fresh chopped rosemary to the garlic butter
- Basil Pesto Knots: Mix 2 tablespoons basil pesto into the garlic butter
- Thyme and Lemon Knots: Include 1 teaspoon fresh thyme and zest of one lemon
Cheese Variations
- Three-Cheese Knots: Combine Parmesan, mozzarella, and Romano cheeses
- Asiago Herb Knots: Replace Parmesan with aged Asiago and add Italian seasoning
- Cheddar Jalapeño Knots: Incorporate sharp cheddar and finely diced jalapeños
International Inspired Variations
- Mediterranean Knots: Add sun-dried tomatoes, olives, and feta cheese
- Mexican-Style Knots: Include cilantro, lime zest, and a pinch of cumin
- Asian Fusion Knots: Use sesame oil, ginger, and scallions instead of traditional herbs
Troubleshooting Common Issues
Even experienced bakers encounter challenges when making garlic knots. Here are solutions to the most common problems I’ve encountered.
Dense or Heavy Knots
- Cause: Over-kneading, too much flour, or insufficient rising time
- Solution: Knead just until smooth, measure flour accurately, ensure proper rising conditions
Knots That Don’t Hold Their Shape
- Cause: Under-kneaded dough or insufficient gluten development
- Solution: Knead longer until dough passes the windowpane test
Burnt Bottoms
- Cause: Oven too hot or rack positioned too low
- Solution: Use middle rack position, consider using parchment paper
Pale Color
- Cause: Insufficient baking time or low oven temperature
- Solution: Verify oven temperature with thermometer, bake until golden brown
Perfect Pairings and Serving Suggestions
Garlic knots shine as both standalone treats and complementary sides to various dishes.
Italian Classics
- Pasta Dishes: Serve alongside spaghetti marinara, fettuccine Alfredo, or lasagna
- Pizza Night: Complement homemade or takeout pizza with warm garlic knots
- Soup Pairings: Excellent with minestrone, Italian wedding soup, or tomato basil soup
Casual Dining
- Salad Accompaniment: Perfect with Caesar salad or mixed greens with Italian dressing
- Sandwich Side: Great with Italian subs, meatball sandwiches, or grilled paninis
- Appetizer Spread: Include in antipasto platters with cured meats and cheeses
Family Gatherings
- Holiday Meals: Complement traditional holiday dishes as an elegant bread option
- Potluck Contributions: Always popular at community gatherings and parties
- Game Day Snacks: Serve warm during sports events with marinara dipping sauce
Advanced Techniques for Professional Results
After years of perfecting my technique, I’ve discovered several professional tricks that elevate homemade garlic knots to restaurant quality.
Dough Enhancement Techniques
- Autolyse Method: Mix flour and water first, let rest 30 minutes before adding other ingredients
- Cold Fermentation: Refrigerate dough overnight for enhanced flavor development
- Steam Addition: Place a pan of hot water in the oven for the first 10 minutes of baking
Shaping Mastery
- Consistent Portioning: Use a digital scale to ensure uniform knot sizes
- Proper Tension: Maintain gentle tension while shaping to prevent tearing
- Professional Appearance: Tuck loose ends under each knot for a cleaner look
Flavor Maximization
- Garlic Infusion: Gently cook garlic in butter without browning for optimal flavor
- Layered Seasoning: Season both the dough and the finishing butter
- Fresh Herb Timing: Add delicate herbs after removing from heat to preserve color and flavor
Frequently Asked Questions
Q: Can I make garlic knot dough ahead of time? Yes, you can prepare the dough up to 24 hours in advance. After the first rise, punch down the dough, cover tightly, and refrigerate. Remove from refrigerator 30 minutes before shaping to bring to room temperature.
Q: What’s the best way to ensure my yeast is active? Always check that your water temperature is between 110-115°F using a thermometer. The yeast should become foamy and bubbly within 5-10 minutes after mixing with warm water and sugar. If it doesn’t foam, your yeast may be expired or the water temperature was incorrect.
Q: Can I use bread flour instead of all-purpose flour? Absolutely! Bread flour will create slightly chewier knots with more structure due to its higher protein content. You may need to add a tablespoon or two of additional water as bread flour absorbs more liquid.
Q: How do I prevent my garlic from burning in the butter? Cook the garlic over low heat and remove the pan from heat as soon as it becomes fragrant, usually within 1-2 minutes. Burnt garlic tastes bitter and will negatively impact your knots’ flavor.
Q: Can I freeze unbaked garlic knots? Yes, after shaping the knots, place them on a baking sheet and freeze until solid. Transfer to freezer bags and store for up to 3 months. Thaw completely and allow to rise before baking, adding 5-10 extra minutes to rising time.
Q: What should I do if my dough isn’t rising? Check that your yeast is fresh and was properly activated. Ensure your rising environment is warm (around 75-80°F) and draft-free. If your kitchen is cold, try placing the dough near a warm oven or in a slightly warmed oven that’s been turned off.
Q: How can I make my garlic knots more garlicky? Increase the minced garlic in your butter mixture, or add roasted garlic paste for a mellower, sweeter garlic flavor. You can also incorporate garlic powder into the dough itself for an extra layer of flavor.
Q: Is it necessary to use fresh herbs, or can I substitute dried ones? While fresh herbs provide the best flavor and appearance, you can substitute dried herbs using a 3:1 ratio (if a recipe calls for 3 teaspoons fresh, use 1 teaspoon dried). Add dried herbs to the melted butter to help rehydrate them.
Q: Can I make gluten-free garlic knots? Yes, substitute the all-purpose flour with a gluten-free flour blend designed for baking. The texture will be slightly different, and you may need to adjust liquid ratios. Allow extra rising time as gluten-free doughs often rise more slowly.
Q: What’s the secret to getting perfectly golden knots? Ensure your oven is properly preheated, position knots on the middle rack, and brush with an egg wash (beaten egg mixed with a tablespoon of water) before baking for extra golden color. Avoid opening the oven door frequently during baking.
Creating perfect homemade garlic knots is a skill that improves with practice, but even your first attempt will likely yield delicious results. The combination of tender, yeasty dough and aromatic garlic butter creates an irresistible treat that brings people together around the table. Whether you’re serving them as an appetizer, side dish, or midnight snack, these garlic knots represent the beautiful simplicity of Italian-inspired home cooking.
My passion for garlic knots extends beyond their incredible taste to the joy they bring to those who share them. There’s something special about breaking bread together, especially when that bread is warm, buttery, and infused with the comforting aroma of garlic and herbs. I encourage you to make this recipe your own, experimenting with different herbs, cheeses, and flavor combinations until you discover your perfect version.
Remember that baking is both an art and a science. While following the recipe closely will yield excellent results, don’t be afraid to trust your instincts and make adjustments based on your environment, preferences, and experience. Each batch of garlic knots is an opportunity to refine your technique and create something truly memorable for the people you love.